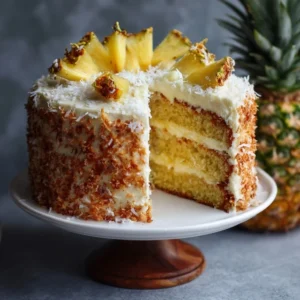
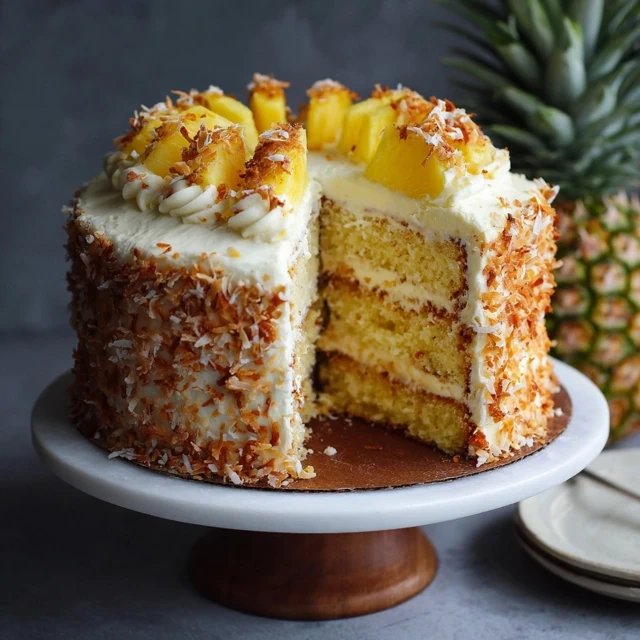
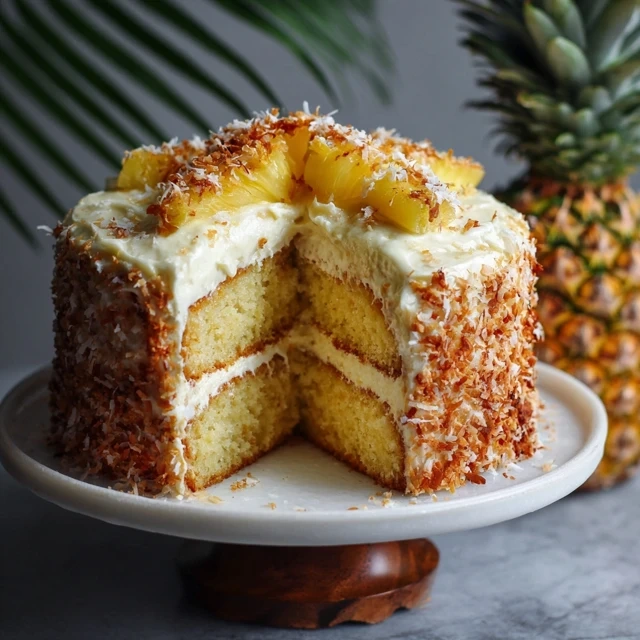
Imagine a slice of paradise on your plate. The pineapple coconut dream cake is more than a dessert. It’s a journey to sun-kissed beaches and gentle tropical breezes. Each bite combines sweet pineapple and creamy coconut, waking up your taste buds.
This cake is a true tropical treat. It has moist layers with vibrant pineapple and delicate coconut. It’s not just a dessert; it’s a trip through lush island landscapes. If you dream of a Caribbean getaway or just want a taste of sunshine, this cake is your answer.
Key Takeaways
- Experience a tropical dessert that brings island flavors to your kitchen
- Discover a moist, flavorful cake that balances pineapple and coconut
- Learn how to create a show-stopping tropical dessert recipe
- Transform simple ingredients into an extraordinary culinary experience
- Enjoy a dessert that’s both visually stunning and deliciously satisfying
Discover the Magic of Pineapple Coconut Dream Cake
Explore the world of tropical desserts with a hawaiian-inspired cake. It turns simple ingredients into a spectacular culinary experience. The Pineapple Coconut Dream Cake is more than a sweet treat. It’s a journey through vibrant tropical flavors that capture the essence of island cuisine.
Origins of Tropical Layer Cakes
Tropical fruit desserts have deep roots in Pacific Island culinary traditions. Hawaiian bakers pioneered creative techniques for incorporating local fruits into delectable baked goods. The tropical fruit dessert concept emerged from combining fresh, abundant ingredients with European baking methods.
- Originated in Hawaiian island kitchens
- Blend of indigenous ingredients and global baking techniques
- Celebration of local tropical produce
Why This Recipe Stands Out
This hawaiian-inspired cake stands out for its perfect balance of flavors and textures. Unlike traditional cakes, it offers a unique sensory experience. It transports you directly to a sunny tropical paradise.
Key Flavor Combinations
The magic of this cake lies in its harmonious flavor profile. Pineapple brings bright, tangy notes while coconut adds creamy richness. These ingredients create a symphony of taste that delights the palate and evokes memories of island vacations.
- Pineapple: Bright, acidic undertones
- Coconut: Smooth, rich complement
- Perfect sweet-tangy balance
Essential Ingredients for Your Tropical Masterpiece
Making an easy pineapple coconut cake needs the right ingredients. These ingredients turn a simple recipe into a moist, flavorful cake. The key is to pick fresh, high-quality items that blend well together.

Your baking journey starts with top-notch ingredients. Fresh pineapples and quality coconut products are essential. They make your dessert truly special.
Key Cake Ingredients
- All-purpose flour (unbleached preferred)
- Granulated sugar
- Unsalted butter
- Large eggs
- Baking powder
- Salt
Tropical Flavor Enhancers
- Fresh pineapple chunks
- Unsweetened shredded coconut
- Coconut milk
- Pure vanilla extract
| Ingredient | Purpose | Quality Tip |
|---|---|---|
| Fresh Pineapple | Moisture and Flavor | Choose ripe, golden pineapples with minimal brown spots |
| Shredded Coconut | Texture and Tropical Taste | Use unsweetened, fresh-grated coconut for best results |
| Coconut Milk | Richness and Depth | Select full-fat, organic coconut milk |
The quality of your ingredients affects your cake’s taste. Fresh, premium ingredients are the foundation of an extraordinary tropical dessert.
Get ready for a baking adventure that will take you to a tropical paradise. This easy pineapple coconut cake recipe is waiting for you!
Kitchen Tools and Equipment Needed
To make your Pineapple Coconut Dream Cake, you need the right tools. Having the essential baking equipment makes creating your tropical dessert easy and fun.
Starting with summer baking means having the right tools ready. The success of your cake isn’t just about ingredients. It also depends on the quality of your kitchen tools.
Must-Have Baking Tools
- 9-inch round cake pans – Critical for creating perfect cake layers
- Electric mixer (stand or hand mixer) – Ensures smooth batter and frosting
- Cooling rack – Allows cakes to cool evenly
- Offset spatula – Perfect for spreading frosting and creating smooth surfaces
- Parchment paper – Prevents cake from sticking to pans
Optional but Helpful Equipment
- Cake turntable – Makes frosting and decorating easier
- Bench scraper – Helps create clean cake edges
- Piping bags and tips – For decorative frosting designs
- Digital kitchen scale – Provides precise ingredient measurements
Measuring and Mixing Essentials
Accurate measurements are key in summer baking. Invest in quality measuring cups and spoons for both dry and liquid ingredients. Nested measuring cups for dry ingredients and clear glass for liquids ensure consistent results.
Pro tip: Always use room temperature ingredients for the best cake texture and even mixing. This small step can dramatically improve your baking results.
Step-by-Step Baking Instructions
Making an easy pineapple coconut cake is all about precision and passion. Start your tropical dessert adventure with careful preparation. Pay attention to every detail. Follow these steps to turn simple ingredients into a tasty tropical treat.
- Prepare Your Baking Space
- Preheat oven to 350°F
- Grease two 9-inch round cake pans
- Line pan bottoms with parchment paper
- Mix Dry Ingredients
- Sift cake flour
- Add baking powder
- Combine shredded coconut
- Create Wet Ingredient Mixture
- Cream butter and sugar
- Beat in eggs
- Add vanilla extract
The key to a great easy pineapple coconut cake is gentle mixing. Mix dry ingredients and crushed pineapple with your wet mix. This method makes the cake moist and tender, full of tropical flavors.
| Mixing Stage | Technique | Time |
|---|---|---|
| Initial Mixing | Low Speed | 2-3 minutes |
| Final Incorporation | Gentle Folding | 1-2 minutes |
Pour batter into prepared pans. Bake for 25-30 minutes, flipping halfway for even baking. Your cake is done when a toothpick comes out clean.
Let the cake cool completely before frosting. This easy pineapple coconut cake will take you to a tropical paradise with every bite.
Creating the Perfect Coconut Pineapple Frosting
Make your piña colada cake special with a creamy coconut pineapple frosting. It turns a simple dessert into a tropical dream. This frosting combines the flavors of the Caribbean in a single recipe.
To make the perfect frosting, you need precision and some tricks. Your aim is to get a smooth, spreadable frosting that tastes like the tropics.
Frosting Consistency Tips
Getting the frosting just right is key for your piña colada cake. Here are some tips:
- Use room temperature butter for maximum smoothness
- Sift powdered sugar to prevent lumps
- Add liquid ingredients gradually to control thickness
- Chill the frosting for 15-20 minutes before decorating
Decorating Techniques
Turn your frosting into a work of art with these decorating tips:
- Use a piping bag with star tip for elegant swirls
- Create rustic peaks with an offset spatula
- Sprinkle toasted coconut flakes for texture
- Garnish with fresh pineapple chunks
Storage Guidelines
Keep your frosting fresh by storing it right. Refrigerate in an airtight container for up to 5 days. Before serving, let it sit at room temperature for 15 minutes to get its creamy back.
Tips for Achieving the Perfect Moisture and Texture
Making a moist layer cake needs precision and skill. Your Pineapple Coconut Dream Cake can go from good to amazing with a few expert tips. These tips will help you get a tender, delicious crumb.
The key to a moist cake is choosing the right ingredients and preparing them well. Make sure to measure your ingredients accurately. This small detail can greatly affect the cake’s texture.
Using room temperature ingredients is also important. They mix better, creating a batter that’s evenly moist.
- Use fresh, high-quality ingredients for optimal flavor and texture
- Avoid overmixing the batter, which can develop tough gluten strands
- Check cake doneness with a toothpick inserted in the center
- Allow cakes to cool completely before frosting
Baking temperature is crucial for keeping the cake moist. Preheat your oven and use the middle rack for even heat. Lower temperatures (around 325°F) help prevent dry edges and keep the center moist.
Adding moisture-rich ingredients like sour cream, buttermilk, or Greek yogurt is a good idea. These ingredients add extra tenderness and create a soft, dreamy texture. This is perfect for a tropical-inspired cake.
Serving and Presentation Ideas
Turn your Pineapple Coconut Dream Cake into a stunning tropical dessert. It will impress your guests. Creative serving techniques can make your summer baking ideas shine.
Presenting your cake is more than just cutting and serving. A good presentation can make your dessert a hit. It becomes a conversation starter and a visual masterpiece.
Garnishing Options
Enhance your tropical dessert with these elegant garnishes:
- Fresh pineapple wedges around the cake base
- Toasted coconut flakes on top
- Edible tropical flowers like orchids or hibiscus
- Mint leaves for a green touch
Plating Suggestions
Bring your summer baking ideas to life with thoughtful plating. Here are some presentation ideas:
| Occasion | Plating Style | Recommended Garnish |
|---|---|---|
| Casual Gathering | Rustic wooden board | Toasted coconut |
| Elegant Dinner Party | White porcelain plate | Edible flowers |
| Tropical Themed Event | Banana leaf plate | Fresh fruit slices |
Remember, presentation is key when serving your Pineapple Coconut Dream Cake. A beautiful display can make your dessert taste even better!
Storage and Make-Ahead Guidelines
Keeping your pineapple coconut dream cake fresh is key. The right storage methods help it stay moist and tasty for days. Here’s how to keep your dessert in top shape.
For short-term storage, wrap your cake well to keep it moist. Follow these tips:
- Room temperature storage: Keep the cake in an airtight container for up to 2 days
- Refrigerator storage: Extends cake freshness to 5-7 days
- Use plastic wrap or cake carrier to protect frosting and prevent absorption of other flavors
Freezing your pineapple coconut dream cake is great for longer storage. Here’s how to freeze and thaw it right:
- Wrap cake tightly in plastic wrap
- Add a layer of aluminum foil for extra protection
- Freeze for up to 3 months
- Thaw overnight in refrigerator before serving
Pro tip: Slice the cake before freezing for easier portioning and faster thawing. This way, you’ll always have a delicious tropical dessert ready to wow your guests!
Troubleshooting Common Baking Issues
Baking an easy pineapple coconut cake can sometimes present challenges, but with the right knowledge, you can overcome most baking obstacles. Understanding potential issues will help you create a perfect tropical dessert every time.
Baking success depends on precision and understanding your ingredients. Let’s explore common problems and their solutions for your delightful pineapple coconut cake.
Mastering Temperature Control
Oven temperature can make or break your easy pineapple coconut cake. Invest in an oven thermometer to ensure accurate heat distribution. Uneven baking often results from incorrect temperatures.
- Preheat oven for at least 20 minutes
- Check oven calibration regularly
- Use center rack for consistent baking
- Rotate cake midway through baking
Ingredient Substitution Guide
Flexibility is key when preparing your pineapple coconut cake. Here are some smart ingredient swaps:
| Original Ingredient | Potential Substitute | Notes |
|---|---|---|
| All-purpose flour | Gluten-free flour blend | Maintains similar texture |
| Butter | Coconut oil | Enhances tropical flavor |
| Eggs | Applesauce or mashed banana | Works for vegan options |
Remember, precise measurements and room temperature ingredients are crucial for creating the perfect easy pineapple coconut cake. Practice and patience will help you master this delightful tropical dessert.
Variations and Dietary Adaptations
Your Pineapple Coconut Dream Cake can be changed to fit different diets. It keeps its tasty tropical flavor. You can make it gluten-free or try new tastes. These changes let you make a cake that everyone can love.
Gluten-Free Modification
To make it gluten-free, just replace wheat flour with other options:
- Almond flour blend
- Gluten-free all-purpose flour mix
- Coconut flour (use less liquid)
Vegan Transformation
For a vegan version, use these swaps:
- Flax eggs instead of chicken eggs
- Coconut milk or almond milk
- Vegan butter alternatives
- Aquafaba for meringue-like frosting
Alternative Fruit Variations
You can try other fruits to mix up the taste:
- Mango-Coconut fusion
- Passion fruit and coconut layers
- Guava-infused tropical cake
Cake Format Options
You can make it in different ways:
- Traditional layer cake
- Cupcake version
- Sheet cake for big groups
Remember, each change might need some tweaks. Feel free to try new things and make it your own!
Conclusion
Your journey with tropical desserts doesn’t stop here. The Pineapple Coconut Dream Cake is more than a tasty treat. It turns your kitchen into a lively Caribbean culinary adventure. Each slice is a story of flavor, creativity, and baking passion.
Make this cake for a summer party, family event, or a sweet treat for yourself. Your Pineapple Coconut Dream Cake will be a hit. You can tweak the recipe to make it your own, keeping its tropical charm.
We encourage you to share your baking stories. Post pictures of your creations, exchange tips with other bakers, and keep exploring tropical desserts. Your creativity makes every Pineapple Coconut Dream Cake unique.
Baking brings people together through joy and tasty moments. Your next baking project is just around the corner. Dive into tropical flavors and let your imagination run wild!
Pineapple Coconut Dream Cake
Ingredients
- Cake Layers
- 1 box white or yellow cake mix 15.25 oz
- 1 cup crushed pineapple with juice
- ½ cup shredded coconut
- ½ cup vegetable oil
- 3 large eggs
- ½ cup milk or coconut milk
- Filling
- 1 20 oz can crushed pineapple (drained slightly)
- ½ cup sugar
- 1 tbsp cornstarch
- Frosting
- 1 8 oz package cream cheese, softened
- 1 8 oz container whipped topping (Cool Whip)
- ½ cup powdered sugar
- ½ cup shredded coconut plus extra for topping
Instructions
- Preheat Oven:
- Preheat oven to 350°F (175°C). Grease and flour two 9-inch round cake pans.
- Prepare the Cake Batter:
- In a large mixing bowl, combine cake mix, pineapple (with juice), shredded coconut, oil, eggs, and milk.
- Mix until smooth and well blended.
- Bake the Cake:
- Divide batter evenly between pans and bake for 25–30 minutes, or until a toothpick inserted in the center comes out clean.
- Let cakes cool completely before frosting.
- Make the Pineapple Filling:
- In a small saucepan, combine pineapple, sugar, and cornstarch.
- Cook over medium heat until thickened (about 5–7 minutes).
- Cool completely before spreading on the cake.
- Prepare the Frosting:
- Beat cream cheese and powdered sugar until smooth.
- Fold in whipped topping and shredded coconut until creamy and fluffy.
- Assemble the Cake:
- Place one cake layer on a serving plate. Spread with pineapple filling.
- Top with the second layer and frost the entire cake with coconut frosting.
- Garnish and Chill:
- Sprinkle with extra shredded coconut.
- Chill for at least 1 hour before serving for the best texture and flavor.
Notes
- Substitute fresh whipped cream for Cool Whip if preferred.
- Add toasted coconut on top for extra crunch.
- Store leftovers in the fridge for up to 4 days.